Showing posts with label 1st. Show all posts

Tuesday, December 20, 2011

Christmas Favorites {Cookie Jar Design}

This is a very easy, and fun holiday project that I do nearly every year with Kindergarten and 1st grade.

Since things get so crazy around the holidays and my patience is limited with messy projects, this is a good one because it is a mostly no-fail drawing.

I say no-fail because there is a high chance of success as the students use tracers for a majority of the drawing, adding little details that are hand-drawn and distinguish each artwork. Giving students projects where they can be successful, like this one, takes off some of the pressure when students are not confident in their drawing skills.

To begin, I tell students the story of the Gingerbread man. At my school, there is a kit with a fox puppet head and I have a stuffed Gingerbread man and a gingerbread apron. Sometimes I just tell the story using the props, but I let 1st graders use the props and act it out as I tell the story of the gingerbread man.

I use the 'Run Run, As Fast as You can.....You can't catch me, I'm the gingerbread man' as a call back for the lesson....it is fun to teach them and fun to say. I use the call back when I need to get their attention before transitioning into various steps.

The purpose of the cookie jar project is to trap the gingerbread man inside so he can't escape and get gobbled up by a fox. I usually have a few books like the Ginerbread Friends and Gingerbread Baby books by Jan Brett in the room for 'candy references'. 

Anyway, after the story, I demonstrate how to trace a big cookie jar on a 12X18 sheet of white paper. Students use pencils to trace 'cookie' shapes. I encourage 1st graders to OVERLAP their shapes....I introduce the concept of OVERLAPPING to Kindergarten, but most of them don't really get it yet and are still getting used to the idea of tracing a shape. The little ones also need to be reminded not to let their shapes float out of the jar, they should remain inside that outline.

Tracers include a bell, tree shape, candy cane, star, gingerbread man, and a round shape that could be a chocolate chip cookie, a donut or a big sucker.

After tracing shapes, and adding candy for the faces, and other simple details, students trace their pencil lines in sharpie marker. I always encourage them to go back with an eraser before they start coloring to make sure that the pencil lines are gone.

Tracers, one set for each table
Students color their designs with crayons and in the last few minutes, I give them scissors to cut out the outside shape of the cookie jar. With Kindergarten, I always have to STRESS that they should ONLY cut out the jar, not each cookie.

After cutting out the jar, students glue a strip along the top for the lid (so the gingerbread man can't get out!).

I usually use this lesson as a make-and-take-home project before Christmas...rather than hanging them up to display, I let everyone take it home the same week.

This year, something so cute and funny happened with a kindergartener and his cookie jar. He explained, "My gingerbread man is really old...he's and old man...he needs a cane to walk...a candy cane!"

It was so funny, I shared it with all of my classes while I was demonstrating the basic steps of tracing the shapes inside the jar.

If students finish early, I encourage them to add other candy in the white areas...easy things like gum, skittles, m&ms, or hershey's kisses.

At the very end, if someone gets completely finished, I usually have paper available for them to make a card, and I write "Merry Christmas" on my example card and draw a little Christmas tree on the inside. Few students usually have 'free time.'

Christmas Favorites {Winter Cardinal}

 Since our school mascot is the Cardinal, I am always looking for beautiful cardinal lessons. I do several varieties a year....everything from school spirit cardinal posters to a really cute snow globe I designed a few years ago. (I'll have to get that typed with pictures, it is SO cute!)

This year, I fell in love with the Art Projects for kids watercolor cardinal so much that I decided to try her basic idea with a couple of classes of kindergarten.

Using Kathy's basic steps for drawing, I let the students use a wing tracer in the center of turquoise construction paper.

We used her basic steps, using a pencil to finish drawing the body, legs, eye, 'mohawk', tail etc.

After drawing, students trace over pencils lines with a sharpie, coloring in the black 'mask' around the face. Students could also add a twig....they choose whether the cardinal is flying away from the branch or about to land (depending on which side has the most room).

Students colored the beak and legs with a yellow construction paper crayon, and used a green construction paper crayon on the twig.

I split this lesson into three weeks. The second week, we painted the cardinal red and after everyone was done with red, I set out white paint for snow.

I had to STRESS, rather emphatically with my kindergarteners, NOT to let the two paint colors mix. I didn't even let both paint colors be on the table at the same time.

The third week, students re-outlined their sharpie lines and drew things back on that were gone after painting...like the eye and black mask. This step only took 4-5 minutes.

They are SOOOOO cute!! I can't wait to finish them up with other classes. The painting and drawing could all be done in one week...I just like to split things up sometimes.

Thanks for reading. If you do something similar this winter, I would love for you to post a link in the comments!!

Christmas Favorites {Nutcracker Drawing}

One of my favorite Christmas projects for K and 1st is the Nutcracker drawing. I got the basic steps from Art Projects for Kids. It would be easily adapted to older grades.

Next year, I want to get my hands on the book (illustrated by Maurice Sendak!!) for the lesson. For now, I just tell the story from the ballet, using my nutcracker statue as an example. Some students have been to the ballet, but most know the story from the Barbie cartoon. 


Uncle Drosselmeyer, godfather of Clara and Fritz....with his eye patch, this one matches the one that I show students.

 Some of the Kindergarten nutcrackers end up looking quite scary!


 This year, I had the kindergarteners draw in pencil, trace in sharpie and color with crayons...all in one 50 minute session.

NOTE: I would definitely split this into a two-week project in the future. By the time they get to coloring, they hardly care enough about the details to finish it really well.


 For 1st grade, I already had tempera paint out for a big kid project, so I decided to let them paint their nutcrackers. In addition to the paint that was available, I prepared jars of peach for the wooden faces and glittery white for the furry beard.

Week 1, draw the nutcracker, trace in sharpie and paint with tempera paint.

Week 2 re-trace sharpie details (like noses and buttons that were covered with paint) Cut out to make an ornament/puppet.

For the display, I put them over red fabric, with a gold paper 'matte'....stunning!


Friday, September 30, 2011

Chalk Pastel Landscapes

Well I know I mentioned in this post, that I was wondering about the relevance of centering an entire project around one single 'element' of art, and I have come to the conclusion, that it is most definitely okay to do that with kindergarteners. They get super excited about simple things....oohing...and aaaahing...about using a black crayon, if you pitch it to them with the right sparkle in your voice.

With this project, I am able to take a simple line drawing and encourage students to create a beautiful work of art. Now, I admit, I sort of stole this idea from School Arts magazine, and made it my own.

Landscapes are such a simple concept for art lovers...but for 5-year-olds, I've  figured out that  I actually have to teach them what a landscape is. Since it is a pretty easy concept, I use this lesson to implement procedures that I will use all year. This is a very successful lesson, that I have taught nearly 100 times (have I mentioned that I have 11 classes of kindergarten and 2 classes of first grade...often I will do this 13 times in one week!)

Below, I will outline my procedures for putting on a paint shirt, using the drying rack, washing hands in the water bucket, and what to do for 'free time' for those that finish early.

To begin the lesson, I show students how to put on paint shirts for the first time. In my classroom, I have a laundry basket full of old janitors shirts, the kind the button up the front. I demonstrate (with a student model) how to put it on backwards, and have a friend put a clothespin on the back, not too high or else it could choke them, and not too low, because they could sit on it!

After observing how to put on the paint shirt, we quickly play a game! I have students play the line game to review the lines that were learned and practiced the week before. To see more about this game, read here. 

Line Landscape:

1. Say: Today we will be using chalk to create a beautiful landscape. Say that with me: Landscape! Again: Landscape. Not LAMBScape, LANDSCAPE!


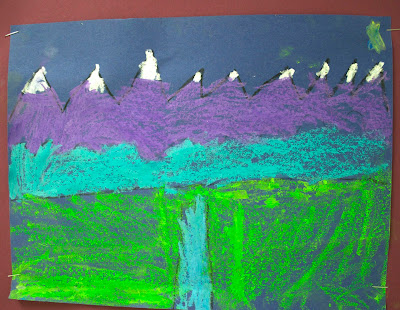
2. A landscape is an 'outside scene', I explain as I point to a couple of magazine photos hanging on the board. I point out how there is a horizon line, with purple mountains meeting the sky, and there are beautiful purple flowers, a lake reflecting the sky and that the photo was probably taken in the early morning. I also point out a few other details from other landscapes, found in magazines.


3. Today, we will be using 3 simple lines to make our landscape. A zigzag, a wavy and a straight line. I draw these on the board as I say each one. Then I have students draw each line in the air with their finger.


4. Students get to choose between purple and blue paper. I say, I'm choosing purple because I want mine to be an early morning picture, just like the mountain landscape I showed them. Step One is to use a black crayon to draw a zigzag line. 'What do you think the zig zag line is for?', I ask. 'Mountains!' the class replies. 'Yes, mountains,' I say as I draw the foothills and the straight line at the bottom. Then I add a moon or a sun, clouds and a little stream or road curving from the bottom edge towards the middle.


5. To finish the landscape, we will be using chalk pastels. 'Raise your hand if you have used sidewalk chalk'...'then you know how dusty chalk can be! Well, chalk dust can be very messy and it can stir up kid's allergies, so I put my chalk in a tray with a little bit of water. It is still sort of messy, and cold, and wet, but it keeps the dust from floating up in the air and making kids cough!'


My Demo...I do one in front of every class.
6. I demonstrate how to color the landscape. I show how to layer two colors on the mountains...I explain that some colors don't show up good at first until they dry (like white!), and I explain that if they get a tiny hole in their paper, because a spot of water makes it rip, to leave it alone because I can always tape it on the back next week, after it is dry.


7. Procedure for Drying Rack: When students are finished, they will put their landscape in the drying rack. Usually, this is the first time they have used the drying rack, so I model where it is and explain that they must 'ALWAYS, ALWAYS START AT THE BOTTOM', I have them chant that with me a few times.

8. Procedure for Water Bucket: 'Once your painting is in the drying rack, you will need to wash your fingers. Over here, we have the water buckets. (I don't let my kinders use the sink, see why here). I have a GIRLS water bucket and a BOYS water bucket. There are two sponges in each bucket.....That means two girls can wash their hands at the same time...and two boys can wash their hands at the same time! If there are already two girls in the bucket, you must wait in line behind them being careful not to touch anyone or anything with your messy fingers while you wait.

9. I point out how to get a paper towel and wash hands, and where the trash cans are. 'Only after your paper is in the drying rack, and your hands are clean should you take off your paint shirt!'

10. If someone finishes early, they might have a chance to color a paper to take home today. Somewhere in the room, I have a copy of the 'Starry Night' by Vincent Van Gogh. I have students try to find it...then I show that they can color a 'coloring sheet' copy of it with crayons. Students should not use the chalk to color it, I put the copies near crayon baskets, that they can get for their table.
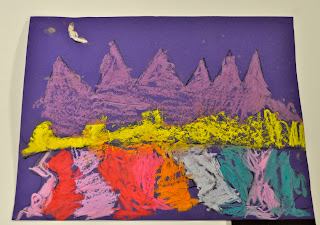
12. After demonstrating everything, and modeling the procedures, I am ready to distribute materials. I have 3 tables start putting on paint shirts (without my help, I've just modeled it for them, I let them try it alone.) The other three tables stay where they are as I go around and let them choose between purple and blue paper. I distribute the black crayons and then assist with putting on paint shirts, while at the same time, I'm constantly saying things like: "When you make your zig zag line, make sure it goes from one side to the other!' and "Draw three lines, zig zag, wavy and straight...then add your other details."  As the paint-shirt students start sitting down, I begin giving them their papers and letting the ones who have been drawing get up to put on their paint shirts.

13. As soon as everyone has their paint shirts on, and are finished drawing, I remind them to PUT THEIR NAMES ON THE BACK. I check each table for names, before I hand them their tray of chalk. Then I say, 'Everyone say this with me: ew, sick disgusting!' Now they have all said 'ew, sick, disgusting about the wet chalk, they are not allowed to say those words again!
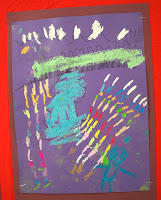
Not a 'landscape'....but it is a cool line design!


14. I monitor as students work....pointing out that they don't have to color the sky, because the sky can be left the color of the paper....but they do have to color everything else. Biggie: STUDENTS MUST COLOR ALL THE WAY FROM THE ZIG ZAG TO THE WAVY LINE. Otherwise, they will leave a big patch uncolored, and the zigzag line area doesn't look like mountains.

Sometimes I use 'non' examples to encourage kids to follow directions. But, often, those are my favorites
15. Students often need help putting papers in the drying rack. I don't let them handle the chalk trays, because the water spills...so I have to pick those up from each table....and I have to monitor the water buckets so that students do not play around, or drink the water....Weird I know, but I've looked over to see those handwashing sponges hanging out of kids' mouth's before! I've also seen kids dipping their head into the water so that their hair gets wet, or using the water buckets as their own personal bath tub, washing up to their armpits! I've also had many instances of water fights and serious splashing issues!

16. When students line up at the end, I use that time to point out Vincent's painting (usually above my door) and I have them point to their own copy: the moon, the cypress tree, the church, the swirling night sky.


 Thanks for reading!!


Circle Paintings as a Sub Plan

Normally, I would NEVER, NEVER, NEVER leave a painting project with substitute.

Okay, I would definitely never leave a KINDERGARTEN painting project with a sub.....

and I WOULD NEVER leave a kindergarten painting project with a sub on THE FIRST DAY OF PAINTING......but....

This year, I realized one a Thursday night that I would have to be gone the next day, there was absolutely no getting around it...and it was too late to come up with a whole new plan, and besides it would totally screw up my careful lesson planning (which I've already got my plans 'penciled in' in my planner through January)..so I typed up the 'kindergarten painting' sub plan and dropped it off in my classroom around 9:30 that night....and made sure that everything was set up and ready for the sub.....


And you know what? Everything turned out alright!

Here is what I left for the sub....in case you ever need an emergency sub plan....it was great for beginning of the year, kindergarten or 1st grade...I recently read a post 'Be Nice to Your Subs' by an art teacher who gave lots of great tips for preparing for a sub, be sure to check it out!


Shape Painting


1.     Explain that today we will be painting. (The kids will be very excited!)
2.     Point out the painting examples on the board.
3.     Say: We will be painting today but first, I would like to play a game.
4.     There is a stack of laminated shapes on the pink table by the board. Hold one shape up for each table, ask: “What shape is this?’ “How many sides does it have?’ “How many corners does it have?”(One shape for each table: square, triangle, rectangle, circle, oval, rhombus or diamond)
5.     After the shape game, demonstrate how to trace circles on the big white paper taped to the board using some big and little circles. Explain that when one shape covers another shape, that is called overlapping. Have students say ‘overlapping’ out loud. Point to the shape that is made when two circles overlap. Explain that that area is now a new shape. When we are painting the shapes, the ‘overlapped’ area should be a different color than the two circles.
6.     Demonstrate how to make big and little circles on the paper, overlapping and making a few go off of the paper.
7.     Demonstrate how to paint the paper.
a.     Select a light color like yellow, to use this paint, you have to get it wet like watercolor paint, use yellow in one spot, but do not rinse your brush. Continue using yellow all over the paper, in different shapes or overlapped areas.
b.     When you switch colors, you have to rinse your brush very good. Now select another color, like orange. Paint orange in a few areas. 
c.      When students are painting, make sure that they do not TAP their brushes on the side of the bucket, show them what ‘not’ to do. When they tap, that makes the water splatter on other’s paintings and messes up other student’s artwork. Instead, drag the brush gently on the edge of the bucket.
d.     Students may use any color they want in any spot they want, being careful not to put the same color right beside itself. Also, white doesn’t show up good….and they should save BLACK for LAST because it dirties up the water bucket quickly.

8.     After you are done painting all of the shapes on your paper, have 3 teams start putting on paint shirts while the other 3 teams start drawing the circles. This way, you can pass out the supplies and help both groups and the paint shirt area isn’t too crowded.
9.     Once everyone has gotten their paint shirts on, and they are done drawing the circles MAKE SURE THEY WRITE THEIR NAME ON THE BACK BEFORE THEY START PAINTING.
10. Pass out the paint sets and the water buckets to every table.  Remind them to use their first color in several spots, before rinsing out their brush. Assist students as necessary to make sure they are not tapping brushes, hat they are not mixing colors, and they are trying to stay inside the lines of the circles. Encourage them to paint a variety of colors.
11. When students are finished, they should put their papers in the drying rack, we always, always start at the bottom.  There are enough ‘sides’ on the drying rack for each class to fill up one whole side. Please label the classes in the drying racks so I can grade them when I get back on Monday.
12. If they need to wipe off their fingers, they may use the water buckets to do so, only then should they take off their paint shirts.
13. If time allows, point out the ‘shape’ sheet on the red table. Students who have dried off their table may grab a shape coloring sheet and a basket of crayons, they can color it to take home.
14. If you find that you have a LOT of time at the end with a class, you can let them cut out the shapes, but you probably won’t have time for that.

Notes:
I’m attaching my procedure information, please read over how I mark stars...the kids are mostly trained, but it is still early in the year, and this is the first time we are painting! As always, my seating charts are on the black table by the board.

Painting checklist before-you-paint: (for the sub)
·Fill water buckets about ¼ full
· Make sure each bucket has 4 paint brushes
· Fill hand washing buckets with lukewarm water and a tiny bit of soap, each should have 2 sponges for washing
·  Fill a water bucket to use for the demonstration at the front of the room and put a paint set on the pink table to use….also, hang a white paper on the board for the demonstration


Painting checklist: after you paint (for the sub)
· Put up chairs
·  empty water buckets and lay brushes out to dry (don’t forget the ‘teacher’ demonstration bucket)
· Empty hand washing buckets and squeeze out sponges, laying then out to dry

Perhaps I go a bit overboard, typing up a checklist and such detailed instructions, but I know subbing in art can be daunting to substitute teachers. Along with this written lesson plan, I leave visuals on the board, a copy of classroom procedures and my schedule.

For this project students used tempera cakes, but watercolors would've worked just as easily!

I displayed the results along with the 'line designs' from earlier this year. A 'Line and Shape' display, it is really colorful and beautiful. I can't even tell which paintings were done with the sub and which were done under my careful instructions. I love how each person interpreted the same instructions differently. Some didn't follow the directions exactly, but the results were still beautiful.


Friday, January 21, 2011

Greedy Zebra Collage

 Resources to Consider 
Book: Greedy Zebra by Mwenye Hadithi, Adrienne Kennaway (this book is part of a series of African stories)
Images of zebras
Intended Grade Level(s): 1st-2nd
Estimated Class Period(s):  One and a half
Materials Required:  white 12X18 #80 paper --2 sheets,  9X 16 green rectangle, black rectangles for tearing the stripes of the zebra, green tissue paper,  black crayons, scissors, glue, black paint and small brushes, green tissue paper, black yarn
Goals and Objectives: The goals of this lesson are technique and procedure based. 
GLEs Accomplished In Lesson: 
2nd  Grade PP 1.B Paint lines with control of the brush, 3.G Create an artwork that communicates ideas about themes: nature 
EP 1.A Identify and use wavy lines
1.F Identify and use light and dark values

Procedure (Guided Lesson, Instructions, etc): 
 Read the book, show images of zebras (I made a poster covered in cool zebra pictures), read the book Greedy Zebra, demonstrate project in steps. 
 
Project (Steps, Examples, etc):
1.    I explain that students can make a fat zebra that is busting out of his black coat, or they can make a zebra that looks more like the zebra on the cover of the book. I show them a ‘fat’ one with all the threads busting out on the last page of the book and one that I drew. I actually only demonstrate the first one on the board.
2.    I show the zebra drawing step-by-step. Step one, with a black crayon, draw an oval for the body. Step two, draw the neck, head, 4 legs, ears and a tail. I show them that some things need to be colored in solid black (like the ears and the circle for the eye nose,, tip of the tail and maybe the hooves).
3.    For the zebra’s stripes, students are to tear a black rectangle into strips. This is hard for some kids, but it is really good for building fine motor skills. They are supposed to tear skinny strips and glue them on the belly, some should start at the top and some at the bottom so they can meet in the middle. Students should also make strips for the neck and legs. If they have trouble, they can go back and add more stripes with a black crayon.
4.    I had a painting station set up for students to paint the frames. They were to write their name on the back of a white piece of paper and when I call them to the paint station, they are to paint black stripes on white paper—edges only. This would’ve looked cool w/white paint on black paper, but I have a much larger stock pile of white paper so it made sense to just use black paint. They did this at the same time that everyone else was tearing the strips for the zebra's body.
5.    Put everything in the drying wrack and look at books about Africa when finished. (I may have had them start an African mask sketch if they had free time….I had a handout of various African masks available, they were to study it and start planning an African mask on a small sheet of paper.)

Day 2

1.    I explained that we would be finishing our Greedy Zebras today. I demonstrated how to cut out the zebra, glue it to the green paper and then add green tissue paper for grass and bushes. I showed them how to roll the tissue paper into a ball or a tube and then glue it down. I also had a little bit of black yarn cut into small pieces for students to add for fur on the end of the tail and the back of the zebra’s neck.
2.    The last step was to glue the green paper to the frame. When students finished, they put these in the drying wrack. The second half of this lesson only took about ½ of one hour art time. I also had students add more black lines if their zebras needed more stripes.
3.    When finished, we started cutting out a symetrical African mask based on the design from the previous week. (not pictured)


Easy Elephant painting for Kinders

Resources to consider:
I showed them images of elephants. I also read the book Elmer by David McKee
Intended Grade Level(s): K-1
Estimated Class Period(s): 1 or 2
Materials Required: 12X12 white paper at least #80 weight, rulers, pencils, examples finished elephants to reference
Goals and Objectives: The goals of this lesson are to use a variety of colors and tempera paint with control, use shapes and lines in a composition.
Kindergarten PP 1.A Produce a line using crayon, pencil, or marker EP 1.A Identify and use lines 1.B Identify and use shapes I.E Identify and use color
1st Grade PP 1.B Apply paint with a dragging, not pushing motion EP 1.A Identify and use straight, curved, thick and thin lines 1.B Identify and use triangle, circle, square, rectangle and oval shapes 2.A Identify and demonstrate the concept of middle or center AP 2.A Identify the following in artworks: lines, shapes, colors, patterns


Project (Steps, Examples, etc):

1. This is a very simple, successful and straightforward project for little ones.
2. All of my kindergarten students seemed to be familiar with Elmer. I read the book Elmer (there are many in the series to choose from).
3. Demonstrate how to draw an elephant. Start with the trunk. Make a candy cane line and a backwards candy cane line in the middle of the paper. Then extend both lines beside each other, parallel. Close with a a sideways 'm'. Draw a circle around the top of the trunk for the face. Draw a big 'c' on each side for the ears.
4. Add eyes, tusks and lines on the trunk for texture. I showed them to draw the eyes below the 'candy cane curve.'
5. Some students chose to add eye lashes, bows, peanuts or a crown on top of their elephant.
6. Demonstrate how to trace over lines with a sharpie marker, make a black circle in the middle of the eye, color the white of the eye and the white part of the tusks with a white crayon (pressing down hard).
NOTE: If students made their elephants too small, (especially kinders) tell them that the small one could be the baby elephant and to just make another 'mom' elephant on the white area of their paper...that usually helps them and keeps them from getting upset...it also means you don't waste paper by giving them lots of chances.
7. Painting could be done during another class time....I actually had my students draw their elephants at the end of another project so after I read Elmer all we had to do was trace in sharpie and paint. I had an Elmer tracer ready for free time...if students finished early, they could make a little Elmer using crayons to take home.
8. We painted with tempera cake paints. I encouraged them to use yellow first, paint their elephant using any colors they wanted, but save black for last. I also demonstrated that they could paint their elephants with gray, I showed them how to mix black and white and gave them a choice. I encouraged them to paint the background black...but most just went with whatever they were feeling at that moment, they didn't plan it out too much.


 It is always interesting to see the variety of results that I get with a project like this.
I always model and demonstrate my own elephant at the front of the room. 
I show examples of what students in other classes have done and point out thing that are 'good' and 'bad' about each one. No matter how clearly I explain, someone always makes a mess of their paper. 

I have 11 classes of kindergarten. Most students were successful with this project. Their little drawings were precious....and they were able to keep control of the paint...few ruined their project once they added paint. Oh yeah, we did this before Christmas--I am really happy with the results!