Tuesday, December 20, 2011

Christmas Favorites {Cookie Jar Design}

This is a very easy, and fun holiday project that I do nearly every year with Kindergarten and 1st grade.

Since things get so crazy around the holidays and my patience is limited with messy projects, this is a good one because it is a mostly no-fail drawing.

I say no-fail because there is a high chance of success as the students use tracers for a majority of the drawing, adding little details that are hand-drawn and distinguish each artwork. Giving students projects where they can be successful, like this one, takes off some of the pressure when students are not confident in their drawing skills.

To begin, I tell students the story of the Gingerbread man. At my school, there is a kit with a fox puppet head and I have a stuffed Gingerbread man and a gingerbread apron. Sometimes I just tell the story using the props, but I let 1st graders use the props and act it out as I tell the story of the gingerbread man.

I use the 'Run Run, As Fast as You can.....You can't catch me, I'm the gingerbread man' as a call back for the lesson....it is fun to teach them and fun to say. I use the call back when I need to get their attention before transitioning into various steps.

The purpose of the cookie jar project is to trap the gingerbread man inside so he can't escape and get gobbled up by a fox. I usually have a few books like the Ginerbread Friends and Gingerbread Baby books by Jan Brett in the room for 'candy references'. 

Anyway, after the story, I demonstrate how to trace a big cookie jar on a 12X18 sheet of white paper. Students use pencils to trace 'cookie' shapes. I encourage 1st graders to OVERLAP their shapes....I introduce the concept of OVERLAPPING to Kindergarten, but most of them don't really get it yet and are still getting used to the idea of tracing a shape. The little ones also need to be reminded not to let their shapes float out of the jar, they should remain inside that outline.

Tracers include a bell, tree shape, candy cane, star, gingerbread man, and a round shape that could be a chocolate chip cookie, a donut or a big sucker.

After tracing shapes, and adding candy for the faces, and other simple details, students trace their pencil lines in sharpie marker. I always encourage them to go back with an eraser before they start coloring to make sure that the pencil lines are gone.

Tracers, one set for each table
Students color their designs with crayons and in the last few minutes, I give them scissors to cut out the outside shape of the cookie jar. With Kindergarten, I always have to STRESS that they should ONLY cut out the jar, not each cookie.

After cutting out the jar, students glue a strip along the top for the lid (so the gingerbread man can't get out!).

I usually use this lesson as a make-and-take-home project before Christmas...rather than hanging them up to display, I let everyone take it home the same week.

This year, something so cute and funny happened with a kindergartener and his cookie jar. He explained, "My gingerbread man is really old...he's and old man...he needs a cane to walk...a candy cane!"

It was so funny, I shared it with all of my classes while I was demonstrating the basic steps of tracing the shapes inside the jar.

If students finish early, I encourage them to add other candy in the white areas...easy things like gum, skittles, m&ms, or hershey's kisses.

At the very end, if someone gets completely finished, I usually have paper available for them to make a card, and I write "Merry Christmas" on my example card and draw a little Christmas tree on the inside. Few students usually have 'free time.'

Christmas Favorites {Winter Cardinal}

 Since our school mascot is the Cardinal, I am always looking for beautiful cardinal lessons. I do several varieties a year....everything from school spirit cardinal posters to a really cute snow globe I designed a few years ago. (I'll have to get that typed with pictures, it is SO cute!)

This year, I fell in love with the Art Projects for kids watercolor cardinal so much that I decided to try her basic idea with a couple of classes of kindergarten.

Using Kathy's basic steps for drawing, I let the students use a wing tracer in the center of turquoise construction paper.

We used her basic steps, using a pencil to finish drawing the body, legs, eye, 'mohawk', tail etc.

After drawing, students trace over pencils lines with a sharpie, coloring in the black 'mask' around the face. Students could also add a twig....they choose whether the cardinal is flying away from the branch or about to land (depending on which side has the most room).

Students colored the beak and legs with a yellow construction paper crayon, and used a green construction paper crayon on the twig.

I split this lesson into three weeks. The second week, we painted the cardinal red and after everyone was done with red, I set out white paint for snow.

I had to STRESS, rather emphatically with my kindergarteners, NOT to let the two paint colors mix. I didn't even let both paint colors be on the table at the same time.

The third week, students re-outlined their sharpie lines and drew things back on that were gone after painting...like the eye and black mask. This step only took 4-5 minutes.

They are SOOOOO cute!! I can't wait to finish them up with other classes. The painting and drawing could all be done in one week...I just like to split things up sometimes.

Thanks for reading. If you do something similar this winter, I would love for you to post a link in the comments!!

Christmas Favorites {Nutcracker Drawing}

One of my favorite Christmas projects for K and 1st is the Nutcracker drawing. I got the basic steps from Art Projects for Kids. It would be easily adapted to older grades.

Next year, I want to get my hands on the book (illustrated by Maurice Sendak!!) for the lesson. For now, I just tell the story from the ballet, using my nutcracker statue as an example. Some students have been to the ballet, but most know the story from the Barbie cartoon


Uncle Drosselmeyer, godfather of Clara and Fritz....with his eye patch, this one matches the one that I show students.

 Some of the Kindergarten nutcrackers end up looking quite scary!


 This year, I had the kindergarteners draw in pencil, trace in sharpie and color with crayons...all in one 50 minute session.

NOTE: I would definitely split this into a two-week project in the future. By the time they get to coloring, they hardly care enough about the details to finish it really well.


 For 1st grade, I already had tempera paint out for a big kid project, so I decided to let them paint their nutcrackers. In addition to the paint that was available, I prepared jars of peach for the wooden faces and glittery white for the furry beard.

Week 1, draw the nutcracker, trace in sharpie and paint with tempera paint.

Week 2 re-trace sharpie details (like noses and buttons that were covered with paint) Cut out to make an ornament/puppet.

For the display, I put them over red fabric, with a gold paper 'matte'....stunning!


Clay Owls

White clay is colored with construction paper crayons
In the fall, I went to a state convention and saw the most amazing idea for finishing a bisque-fired clay project. The teacher had the students color on their clay with construction paper crayons, and then paint the whole surface with black tempera paint (creating a wax-resist on clay), wiping the paint off so that it just fills in the crevices, leaving the colored areas bright with lots of contrast. I knew it would be perfect for a clay owl project that I do every few years.

I am always looking for single-fired clay projects since I do not have a kiln at my school. When I do clay, I have to pack up all of the (hundreds!) of little clay sculptures, while they are leather hard and haul them to another school, where my mentor fires them and unloads them in and out of the kiln. While I love the look of glaze, it adds several more trips and firings to the whole process. It is a lot of work for me. This also allowed the students to take the project home a whole lot sooner since they were not waiting for it to be glaze fired.

Note: coloring on the clay really chews up your construction paper crayons, so be sure to order plenty if you are doing it with hundreds of kids. ;-)

Materials: white earthenware (bisque fired)
construction paper crayons
tempera paint
After coloring with crayons, students paint over the surface with black paint. It creates amazing contrast with the color!

A Harry Potter owl!


To get those cool eyes, we used repurposed spools of thread to stamp the clay.


I did this project with 2nd, 3rd and 4th grade. The results were stunning. I really did not want to send them home!!

Monday, October 3, 2011

Large Painting With Words


After making a couple of large paintings with words on canvases, I became inspired to do something similar with my students. One of my paintings hangs in my living room, the other is in my classroom. Above, you can see that I added melted crayons to the top...it looks so cool in my classroom!

The week before we painted, I encouraged students to grab a packet of songs I had made with lyrics copied from the internet and read over the choices so that they could select something that would be meaningful to them. I had a wide range of choices, poems like e.e. cummings, i carry your heart, to You're A Grand Old Flag and Amazing Grace. I chose children's songs and poems that I liked....I asked the music teacher if she had any lyric sheets, so that I could use songs they sing in music, but she didn't have anything like that.


So I ended up putting a few easy songs like Twinkle Twinkle Little Star so that they would have some variety. Ideally, this would be a fun project to collaborate with a music teacher or even a classroom teacher...many of my students wanted to write their own poems, but since this was just a one-week project, they didn't really have time to do that.

For my demo, I kept adding to one painting, and showed how to splatter paint
This project could be done in one week, I just wanted them to have a sneak peek at the list.

On painting day, did a demo of how to paint lettering. Since they weren't tracing over something that was already written out, this was really, really good practice for precision painting. I encouraged them to go slow, pay attention to the words and the spelling, and make sure they consider what they will do if they get to the end of the paper, but not the end of the word. I also pointed out that if they mess up, do not put an 'X' over the mistake or try to 'black' it out. Just keep going....the main idea is to have a bunch of words painted on a big paper.


I gave them all the list again and had them make their final choice. Once they had selected, they grabbed a 16X20 piece of paper, I did it on craft brown, but anything would work. It was important that they wrote their names on the back, and then I let them start painting.

This project worked really well with 3rd, and 4th graders. If the table was too crowded, I let some of them sit on the floor.  I tried the project with a class of 2nd grade, and since it was the beginning of the year, it was really hard for them to get the sizing of the letters right...they either did them too big or too little, or tried to black out their mistakes.


As a variation, I did allow one class to add melted wax to a smaller version of the painting, on white watercolor paper. I had a bunch of peeled crayons, I threw them in my wax melter, for encaustic painting, and let my students use the eye dropper and sticks to splatter the paintings with wax.


It didn't work out very well....the wax crumbles off the finished product easily...and the colors got all muddy after they got mixed by 20+ kiddos in one hour.


For the large paintings, I matted a few and hung them up at a local shop in town for the September art walk. It was exciting for my students, the paintings were very meaningful right after September 11th, and it was a great opportunity to show off such a large format.


It was super cool to see my students at the art walk with their families!! Some had never even been to a Third Thursday event.

Friday, September 30, 2011

Chalk Pastel Landscapes

Well I know I mentioned in this post, that I was wondering about the relevance of centering an entire project around one single 'element' of art, and I have come to the conclusion, that it is most definitely okay to do that with kindergarteners. They get super excited about simple things....oohing...and aaaahing...about using a black crayon, if you pitch it to them with the right sparkle in your voice.

With this project, I am able to take a simple line drawing and encourage students to create a beautiful work of art. Now, I admit, I sort of stole this idea from School Arts magazine, and made it my own.

Landscapes are such a simple concept for art lovers...but for 5-year-olds, I've  figured out that  I actually have to teach them what a landscape is. Since it is a pretty easy concept, I use this lesson to implement procedures that I will use all year. This is a very successful lesson, that I have taught nearly 100 times (have I mentioned that I have 11 classes of kindergarten and 2 classes of first grade...often I will do this 13 times in one week!)

Below, I will outline my procedures for putting on a paint shirt, using the drying rack, washing hands in the water bucket, and what to do for 'free time' for those that finish early.

To begin the lesson, I show students how to put on paint shirts for the first time. In my classroom, I have a laundry basket full of old janitors shirts, the kind the button up the front. I demonstrate (with a student model) how to put it on backwards, and have a friend put a clothespin on the back, not too high or else it could choke them, and not too low, because they could sit on it!

After observing how to put on the paint shirt, we quickly play a game! I have students play the line game to review the lines that were learned and practiced the week before. To see more about this game, read here

Line Landscape:

1. Say: Today we will be using chalk to create a beautiful landscape. Say that with me: Landscape! Again: Landscape. Not LAMBScape, LANDSCAPE!


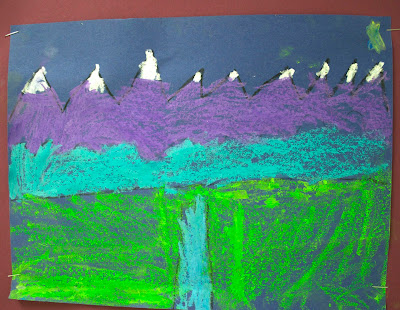
2. A landscape is an 'outside scene', I explain as I point to a couple of magazine photos hanging on the board. I point out how there is a horizon line, with purple mountains meeting the sky, and there are beautiful purple flowers, a lake reflecting the sky and that the photo was probably taken in the early morning. I also point out a few other details from other landscapes, found in magazines.


3. Today, we will be using 3 simple lines to make our landscape. A zigzag, a wavy and a straight line. I draw these on the board as I say each one. Then I have students draw each line in the air with their finger.


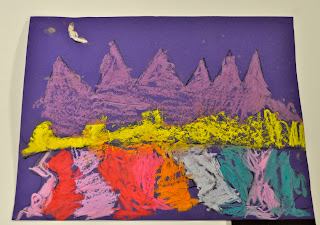
4. Students get to choose between purple and blue paper. I say, I'm choosing purple because I want mine to be an early morning picture, just like the mountain landscape I showed them. Step One is to use a black crayon to draw a zigzag line. 'What do you think the zig zag line is for?', I ask. 'Mountains!' the class replies. 'Yes, mountains,' I say as I draw the foothills and the straight line at the bottom. Then I add a moon or a sun, clouds and a little stream or road curving from the bottom edge towards the middle.


5. To finish the landscape, we will be using chalk pastels. 'Raise your hand if you have used sidewalk chalk'...'then you know how dusty chalk can be! Well, chalk dust can be very messy and it can stir up kid's allergies, so I put my chalk in a tray with a little bit of water. It is still sort of messy, and cold, and wet, but it keeps the dust from floating up in the air and making kids cough!'


My Demo...I do one in front of every class.
6. I demonstrate how to color the landscape. I show how to layer two colors on the mountains...I explain that some colors don't show up good at first until they dry (like white!), and I explain that if they get a tiny hole in their paper, because a spot of water makes it rip, to leave it alone because I can always tape it on the back next week, after it is dry.


7. Procedure for Drying Rack: When students are finished, they will put their landscape in the drying rack. Usually, this is the first time they have used the drying rack, so I model where it is and explain that they must 'ALWAYS, ALWAYS START AT THE BOTTOM', I have them chant that with me a few times.

8. Procedure for Water Bucket: 'Once your painting is in the drying rack, you will need to wash your fingers. Over here, we have the water buckets. (I don't let my kinders use the sink, see why here). I have a GIRLS water bucket and a BOYS water bucket. There are two sponges in each bucket.....That means two girls can wash their hands at the same time...and two boys can wash their hands at the same time! If there are already two girls in the bucket, you must wait in line behind them being careful not to touch anyone or anything with your messy fingers while you wait.

9. I point out how to get a paper towel and wash hands, and where the trash cans are. 'Only after your paper is in the drying rack, and your hands are clean should you take off your paint shirt!'

10. If someone finishes early, they might have a chance to color a paper to take home today. Somewhere in the room, I have a copy of the 'Starry Night' by Vincent Van Gogh. I have students try to find it...then I show that they can color a 'coloring sheet' copy of it with crayons. Students should not use the chalk to color it, I put the copies near crayon baskets, that they can get for their table.

12. After demonstrating everything, and modeling the procedures, I am ready to distribute materials. I have 3 tables start putting on paint shirts (without my help, I've just modeled it for them, I let them try it alone.) The other three tables stay where they are as I go around and let them choose between purple and blue paper. I distribute the black crayons and then assist with putting on paint shirts, while at the same time, I'm constantly saying things like: "When you make your zig zag line, make sure it goes from one side to the other!' and "Draw three lines, zig zag, wavy and straight...then add your other details."  As the paint-shirt students start sitting down, I begin giving them their papers and letting the ones who have been drawing get up to put on their paint shirts.

13. As soon as everyone has their paint shirts on, and are finished drawing, I remind them to PUT THEIR NAMES ON THE BACK. I check each table for names, before I hand them their tray of chalk. Then I say, 'Everyone say this with me: ew, sick disgusting!' Now they have all said 'ew, sick, disgusting about the wet chalk, they are not allowed to say those words again!
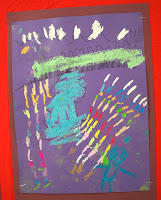
Not a 'landscape'....but it is a cool line design!


14. I monitor as students work....pointing out that they don't have to color the sky, because the sky can be left the color of the paper....but they do have to color everything else. Biggie: STUDENTS MUST COLOR ALL THE WAY FROM THE ZIG ZAG TO THE WAVY LINE. Otherwise, they will leave a big patch uncolored, and the zigzag line area doesn't look like mountains.

Sometimes I use 'non' examples to encourage kids to follow directions. But, often, those are my favorites
15. Students often need help putting papers in the drying rack. I don't let them handle the chalk trays, because the water spills...so I have to pick those up from each table....and I have to monitor the water buckets so that students do not play around, or drink the water....Weird I know, but I've looked over to see those handwashing sponges hanging out of kids' mouth's before! I've also seen kids dipping their head into the water so that their hair gets wet, or using the water buckets as their own personal bath tub, washing up to their armpits! I've also had many instances of water fights and serious splashing issues!

16. When students line up at the end, I use that time to point out Vincent's painting (usually above my door) and I have them point to their own copy: the moon, the cypress tree, the church, the swirling night sky.


 Thanks for reading!!