Resources to Consider similar lesson
Book by: Maurice Sendak
Trailer
Intended Grade Level(s): K-4th grade
Estimated Class Period(s): 2
Materials Required: White 12X18paper, pencils, sharpies, paint
Goals & Objectives: The goals of this lesson are technique and procedure based. The objectives include creating an artwork based on a theme: ‘wild animals’, using a variety of methods and materials, including color mixing, creating tints and shades and painting using a wash.
GLEs Accomplished In Lesson:
PP I.B Paint lines and fill in shapes with even color using tempera (thinned tempera or tempera cakes)
AP 2.A Describe the use of the following in artworks: Outlines, Organic shapes, Organic forms, Positive and negative space, Contrast/ variety of values, Complex patterns
Procedure (Guided Lesson, Instructions, etc):
Read the book, Where the Wild Things Are. Show the movie trailer.
Project (Steps, Examples, etc):
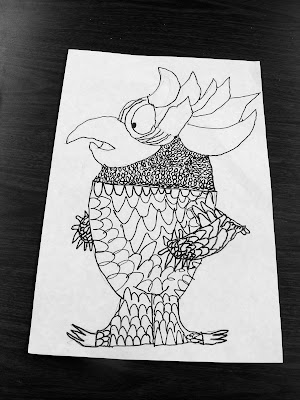
1.Demonstrate how to draw ‘Carol’ using a tracer for the head and then adding the details. I demonstrated this one to every grade so that they could pick the one they wanted to do. (For K and 1st, we ALL drew Carol…sort of a step-by-step drawing.and they could try one of the others on free time only).
2.Have head tracers for 4 of the characters (Douglas, K.W., Carol, Bull), and drawn examples for each one. Students can choose to use one of the tracers or they can try to draw their own head without using the tracer. After drawing the body and adding the details with sharpie marker, students should look at books or try to draw handout if they have any free time. (I put a handout on each table with images of the characters so that they would put details like scales, feathers and claws)
*Also make sure that they erase extra pencil lines after outlining in sharpie marker.


Day 2
1.Review the book. Ask questions like: “Who was max? Where did he go? Who did he meet?” Etc.
2.Explain what wax-resist means. Also, while students are waiting for me to pass out the paint, the crayons will be on their table to touch up and add a tail. Demonstrate how to draw a tail.
3.Show the students the watercolor paint. (For older kids introduce color mixing with colors like tan, pink and yellow-green and gray). List each color. Explain that they have to keep yellow cleaned out. I put out 2 paint sets at every table so some students might have to share.
4.Show students the water bucket. Explain that they should not tap the brushes on the container, it splatters pictures.
5.Demonstrate the painting technique of wax resist. Tell them to use YELLOW first. BLACK should be used last.
6.Demonstrate painting the entire picture and then putting it in the drying wrack. Review how we wash hands and tables. Student should look at books if they get finished with the painting.
7.If time allows, demonstrate how to make a crown for students to wear out the door.


Here is an example of the wax resist Wild Things I did with my K-1 students.

Assessment and Reflection: Students will design a ‘Where the Wild Things Are Character' based on a teacher created rubric as it aligns with district objectives and goals. Students should be able to complete the drawing and painting with little or no teacher assistance and the finished product should have good craftsman ship and details appropriate to the grade level.
Additional Photos:
Here is an electrical tape installation I did in my room during this unit. I used a drawing on a transparency with my overhead projector. Students did drawings of Max which I included on the wall around the tape drawing.


I found a lot of great resources over at the Blog: Terrible Yellow Eyes!


Wouldn't this be a fun collage:

I also created a really cool handout for students that completed their paintings early using a printable Max from the Toy-A-Day blog.
